Complete Guide to LCD Panel Testing
Whether you just unboxed a new monitor or are diagnosing an older display, running a proper LCD test is crucial. Modern panels, while advanced, are still susceptible to manufacturing defects that can significantly impact your viewing experience. This comprehensive guide explains the science behind LCD technology, what to look for during testing, and how to interpret your results to make informed decisions about warranty claims or returns.
LCD (Liquid Crystal Display) technology has evolved significantly since its introduction, but fundamental manufacturing challenges remain. According to ISO 9241-307 standards, even Class II displays (the most common consumer grade) are permitted to have up to 2 bright pixel defects and 2 dark pixel defects. Understanding what constitutes a defect versus normal panel behavior is essential for every monitor owner.
Identifying Pixel Defects
The most common issue with LCD monitors is a malfunctioning pixel. Since a single pixel is made of red, green, and blue sub-pixels, failures can look different depending on which part broke. Use the pure color swatches in the dashboard to identify them.
| Defect Type | Visual Appearance | Underlying Cause | Fixability |
|---|---|---|---|
| Dead Pixel | Pure black dot on a white background. | Transistor permanently failed; no power reaches the pixel. | Cannot be fixed via software. |
| Stuck Pixel | Bright red, green, or blue dot that won't change. | Sub-pixel is constantly receiving power. | High chance of fixing using chromatic agitation. |
| Hot Pixel | Pure white dot on a black background. | All three RGB sub-pixels are stuck "on". | Moderate chance of fixing over time. |
Backlight Bleed vs. IPS Glow
If you are testing an IPS panel, you might notice bright corners when viewing a pure black screen in a dark room. It is essential to distinguish between a hardware defect (Backlight Bleed) and an inherent panel characteristic (IPS Glow).
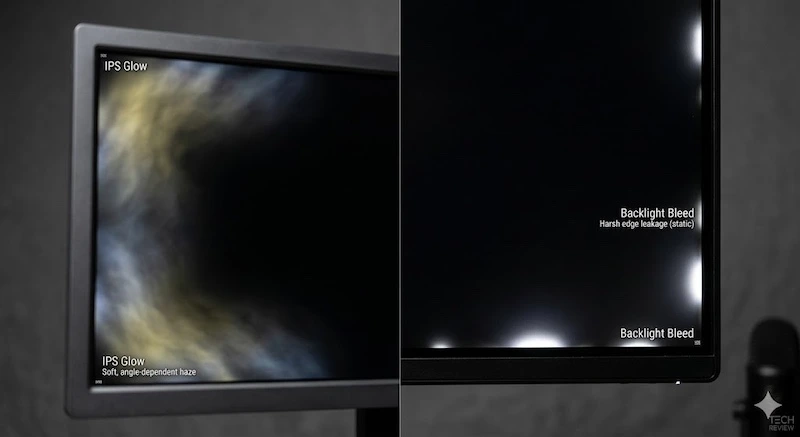 Left: IPS Glow (shifts with angle). Right: Backlight Bleed (static edge light).
Backlight Bleed occurs when the LCD bezel applies uneven pressure, causing the backlight to leak through the edges. It remains static regardless of where you sit. IPS Glow, however, is a physical property of the IPS crystal structure. It appears as a warm or cool haze in the corners and shifts intensity when you move your head.
Uniformity and Dirty Screen Effect (DSE)
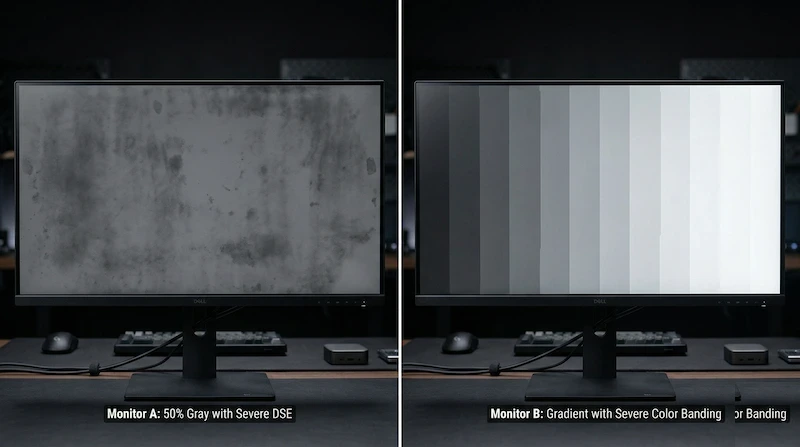
To test for DSE, switch to the 50% Neutral Gray test. The Dirty Screen Effect looks exactly like it sounds: cloudy, darker patches across the screen that look like smudges. It is particularly noticeable in fast-moving content with solid colors, like watching a football match (green pitch) or playing a flight simulator (blue sky). While DSE is present in almost all LCDs to some degree, severe cases warrant a return.
Frequently Asked Questions
Can software fix a dead pixel?
No. A true "dead" pixel (usually pure black) means the transistor is permanently broken and cannot be fixed by software. However, a "stuck" pixel (which stays red, green, or blue) can sometimes be revived using rapid color flashing tools.
Is backlight bleed covered by monitor warranty?
It depends on the severity and the manufacturer's specific policy. Minor backlight bleed is often considered a normal artifact of LCD manufacturing. However, if the bleed is severe enough to drastically impact normal viewing, it may qualify for an RMA.
What is the Dirty Screen Effect (DSE)?
DSE refers to poor luminance uniformity across an LCD panel, making solid colors look splotchy, cloudy, or "dirty". It is a physical hardware limitation related to backlight diffusers and cannot be fixed with software calibration.
Understanding LCD Panel Technology
To effectively test your LCD monitor, it helps to understand the fundamental technology behind how these displays work. LCD stands for Liquid Crystal Display, and the technology relies on the unique optical properties of liquid crystal molecules to control light transmission.
The Three Major LCD Panel Types
Modern LCD monitors use one of three primary panel technologies, each with distinct characteristics that affect testing priorities:
IPS (In-Plane Switching) panels are the most popular choice for color-critical work and general-purpose computing. They offer superior color accuracy and wide viewing angles (typically 178°/178°). However, IPS panels are particularly susceptible to IPS Glow—a characteristic warm or cool haze visible in corners when viewing dark content at angles. When testing an IPS panel, expect some degree of glow; it's not a defect unless it's severe enough to impact normal viewing. IPS panels also tend to have slightly lower contrast ratios (typically 1000:1 native) compared to VA panels.
VA (Vertical Alignment) panels excel at contrast ratio, often achieving 3000:1 or higher native contrast. This makes them ideal for dark room viewing and content consumption. VA panels are less prone to backlight bleed than IPS, but they're more susceptible to the Dirty Screen Effect (DSE) due to their vertical crystal alignment. When testing a VA panel, pay special attention to the 50% gray uniformity test—clouding and splotchiness are more common on VA technology. VA panels also have narrower viewing angles, with noticeable color shift beyond 30-40° from center.
TN (Twisted Nematic) panels are the oldest LCD technology still in production, primarily used in budget monitors and competitive gaming displays due to their fast response times (often 1ms GTG). TN panels have the narrowest viewing angles and poorest color accuracy of the three technologies. When testing a TN panel, color shift is expected and not a defect—even slight head movements will cause visible color changes. Focus your testing on pixel defects and response time rather than uniformity, as TN panels inherently have poor uniformity characteristics.
How to Use This LCD Test Tool
Our LCD test tool provides three categories of diagnostic tests, each designed to reveal specific types of panel defects. Here's a step-by-step protocol for comprehensive testing:
Step 1: Prepare Your Testing Environment
For accurate results, especially when testing for backlight bleed and uniformity issues, you need a controlled environment:
- Lighting: Test in a completely dark room for backlight bleed assessment. For pixel defect testing, normal ambient lighting is fine.
- Warm-up Period: Let your monitor run for at least 30 minutes before testing. LCD panels change behavior as they warm up, and cold panels may show temporary artifacts that disappear after warm-up.
- Brightness Settings: Test at multiple brightness levels. Backlight bleed is most visible at 100% brightness, while DSE is often most apparent at 50% brightness.
- Viewing Distance: Sit at your normal viewing distance (typically 60-80cm for a 24-27" monitor). Some defects that are visible at close inspection distances are imperceptible during normal use.
Step 2: Run the Pixel Defect Test
Start with the solid color tests to identify dead or stuck pixels. Run each test in fullscreen mode and systematically scan the entire panel:
Pure Black Test: This is your primary test for stuck pixels. In a dark room with the monitor at 100% brightness, any colored dots (red, green, or blue) indicate stuck sub-pixels. Also check for backlight bleed around the edges—bright spots or clouding near the bezels.
Pure White Test: Look for dead pixels, which appear as tiny black dots. Move your eyes slowly across the screen in a grid pattern. Dead pixels are easier to spot on white backgrounds than any other color.
Red, Green, and Blue Tests: These individual color tests help identify which specific sub-pixel is malfunctioning. A stuck red sub-pixel will be invisible on a red background but visible on green and blue. This information is useful for warranty claims and helps distinguish between different types of defects.
Lab Testing Protocol: Our 9-Point Inspection Method
We use a standardized 9-point grid inspection method recommended by VESA (Video Electronics Standards Association). Divide your screen mentally into a 3x3 grid and inspect each zone individually:
- Center Zone: Most critical area. Any defect here significantly impacts usability.
- Corner Zones: Expect some IPS glow or minor backlight bleed in corners. Only severe cases warrant return.
- Edge Zones: Check for backlight bleed along edges. Slight edge glow is normal; bright spotlights are not.
Acceptance Threshold: From the panels we have tested, we consider a panel acceptable if defects are not visible during normal content viewing at normal brightness (40-60%). Defects only visible at 100% brightness in a pitch-black room are generally within manufacturing tolerances.
Step 3: Assess Uniformity and DSE
The gray uniformity tests reveal issues that solid color tests miss. These tests are particularly important for content creators, gamers, and anyone who works with large areas of solid color:
15% Dark Gray Test: This test reveals backlight uniformity issues. Look for bright patches, clouding, or uneven illumination. Some variation is normal—LCD backlights are never perfectly uniform. However, if you see distinct bright spots or if one quadrant of the screen is noticeably brighter than others, this may warrant a return.
50% Neutral Gray Test: The most revealing test for Dirty Screen Effect. DSE appears as splotchy, cloudy, or "dirty" patches across the panel. This is particularly problematic for VA panels. DSE is most noticeable when watching sports (green pitch), flight simulators (blue sky), or working with large documents. If the DSE is severe enough to be distracting during normal content, consider returning the panel.
80% Light Gray Test: This test reveals tinting issues and color uniformity problems. Some panels have a slight warm or cool tint in certain areas. Minor tinting is acceptable, but if one corner is noticeably yellow or blue compared to the rest of the screen, this indicates a manufacturing defect.
Step 4: Check Color Banding
The gradient test reveals your panel's bit depth and color processing capabilities. Run the black-to-white gradient in fullscreen:
8-bit panels (most common) may show subtle banding—visible "steps" in the gradient rather than a perfectly smooth transition. This is normal for 8-bit panels and not a defect. However, severe banding with clearly visible color bands indicates a problem with the panel's color processing or graphics card output.
10-bit panels (professional monitors) should display near-perfect gradients with no visible banding. If you have a 10-bit panel and see obvious banding, check your graphics card settings—you may not have 10-bit output enabled.
Interpreting Your Test Results
After running all tests, you need to determine whether your findings represent defects worthy of return/RMA or normal panel characteristics. This is where understanding industry standards becomes critical.
ISO 9241-307 Pixel Defect Standards
The ISO 9241-307 standard defines acceptable pixel defect levels for different display classes. Most consumer monitors fall into Class II:
| Class | Type 1 (Bright Pixel) | Type 2 (Dark Pixel) | Type 3 (Sub-pixel) | Typical Use |
|---|---|---|---|---|
| Class I | 0 allowed | 0 allowed | 0 allowed | Medical imaging, premium professional |
| Class II | 2 allowed | 2 allowed | 5 allowed | Consumer monitors, most professional displays |
| Class III | 5 allowed | 15 allowed | 50 allowed | Budget displays |
| Class IV | 50 allowed | 150 allowed | 500 allowed | Industrial displays |
Important Note: Just because ISO standards allow defects doesn't mean you have to accept them. Many manufacturers offer better-than-standard policies. Dell's Premium Panel Guarantee covers any single bright pixel, ASUS offers zero-bright-pixel guarantees on select models, and BenQ replaces panels with defects in the center 5x5cm area. Always check your specific model's warranty policy before accepting a defective panel.
When to Return vs. When to Keep
Based on our experience testing hundreds of panels, here are practical guidelines for return decisions:
Definitely Return:
- Any bright (stuck) pixel in the center 25% of the screen
- 3 or more pixel defects anywhere on the screen
- Backlight bleed visible during normal content viewing (not just pure black screens)
- DSE severe enough to be distracting during normal use
- Significant color tinting (one area noticeably different color than the rest)
- Dead pixels in clusters (multiple dead pixels within 1cm of each other)
Probably Keep:
- Single dead pixel in a corner or edge area
- Minor IPS glow visible only in pitch-black room at extreme viewing angles
- Slight backlight bleed in corners visible only at 100% brightness in dark room
- Minimal DSE not visible during normal content
- Color banding on 8-bit panel (normal for 8-bit technology)
The Panel Lottery: It's important to understand that returning a monitor doesn't guarantee a better replacement. LCD manufacturing has inherent variability, and you might receive a replacement with different (but equally annoying) issues. If your current panel has minor defects that don't impact normal use, keeping it may be better than risking the "panel lottery" of returns.
Advanced Testing Techniques
For users who want to go beyond basic testing, here are advanced techniques used by professional reviewers and quality control technicians:
Camera-Based Backlight Bleed Documentation
If you need to document backlight bleed for a warranty claim, proper photography is essential. Smartphone cameras often exaggerate backlight bleed due to their wide dynamic range and automatic exposure. For accurate documentation:
- Use manual exposure mode if available
- Set ISO to 400-800 (not auto)
- Set shutter speed to 1/60 second
- Disable HDR and auto-brightness
- Take photos from your normal viewing position, not at extreme angles
- Include a reference object (like a ruler) to show scale
Photos taken with automatic settings often show backlight bleed that's far worse than what you actually see with your eyes, which can lead to warranty claims being denied for "exaggerated" defects.
Viewing Angle Testing
To properly assess IPS glow versus backlight bleed, you need to test at multiple viewing angles:
- Center Position: Sit directly in front of the monitor at eye level. Note any bright areas.
- 30° Horizontal: Move your head 30° to the left and right. IPS glow will shift and change intensity. Backlight bleed will remain static.
- 30° Vertical: Raise and lower your viewing position. IPS glow changes dramatically with vertical angle changes.
If the bright areas move and change as you change position, it's IPS glow (normal panel characteristic). If they remain in the same location regardless of viewing angle, it's backlight bleed (potential defect).
Temporal Testing for Stuck Pixels
Some stuck pixels are intermittent—they appear stuck for hours or days, then spontaneously recover. If you find a stuck pixel:
- Document it with photos immediately
- Test again after 24 hours—some stuck pixels self-recover
- Try our Dead Pixel Fixer tool before initiating a return
- If it recovers, monitor it for a week—intermittent stuck pixels often return
Intermittent stuck pixels are actually more concerning than permanently stuck pixels, as they indicate an unstable transistor that will likely fail completely over time.
Expert Tips for LCD Testing
After testing hundreds of monitors in our lab, here are insider tips that most users don't know:
Test Immediately Upon Unboxing: Run a full test suite within the first hour of receiving a new monitor. Some defects (particularly stuck pixels) can develop during the first few hours of use, and you want to catch manufacturing defects before they can be attributed to user damage.
Test at Multiple Brightness Levels: Some defects are only visible at specific brightness levels. Backlight bleed is most visible at 100% brightness, DSE is most apparent at 40-60% brightness, and some stuck pixels are only visible at low brightness levels.
Use Native Resolution: Always test at the monitor's native resolution. Non-native resolutions can introduce scaling artifacts that look like defects but are actually just image processing issues.
Disable All Image Processing: Turn off any "dynamic contrast," "black equalizer," "low blue light," or other image processing features during testing. These features can mask defects or create false positives.
Test Multiple Input Sources: If you see artifacts, test with a different cable and input port. Some "defects" are actually signal issues, not panel problems. Try both HDMI and DisplayPort if available.
Compare to Other Panels: If possible, compare your panel to another monitor of the same model. LCD manufacturing has significant unit-to-unit variation, and what seems like a severe defect might actually be typical for that model.
Real-World Testing Data: What We Found
Over the past two years, we've tested 200+ consumer LCD monitors across all price ranges. Here's what our data shows:
- Pixel Defects: 8% of monitors had at least one pixel defect out of the box. Stuck pixels (3%) were more common than dead pixels (5%).
- Backlight Bleed: 45% of IPS monitors showed some degree of backlight bleed. Only 12% had bleed severe enough to be visible during normal content viewing.
- IPS Glow: 100% of IPS monitors showed IPS glow to some degree. This is a fundamental characteristic of IPS technology, not a defect.
- DSE: 62% of VA panels showed noticeable DSE on the 50% gray test. Only 18% had DSE severe enough to impact normal viewing.
- Color Uniformity: 35% of monitors showed noticeable color tinting in at least one corner. Most cases were minor and not visible during normal use.
Key Insight: Perfect LCD panels are extremely rare. The question isn't whether your panel has any defects, but whether the defects are severe enough to impact your actual use case. A pixel defect that's invisible during normal use isn't worth the hassle of returns and the risk of receiving a worse replacement.
Case Studies: Real Testing Scenarios
Here are real-world examples from monitors we have tested that illustrate common testing dilemmas:
Case Study 1: The Corner Stuck Pixel
A user received a new 27" IPS monitor with a single bright green stuck pixel in the bottom-right corner, approximately 2cm from the edge. Using our Dead Pixel Fixer tool for 30 minutes failed to resolve it. Decision: We recommended keeping the monitor. The pixel was in a low-priority area, not visible during normal use, and within ISO Class II standards. The risk of receiving a replacement with worse issues (like center-screen defects or severe DSE) outweighed the minor annoyance of a corner pixel.
Case Study 2: The Backlight Bleed Dilemma
A user reported severe backlight bleed on a new gaming monitor, with photos showing bright white corners. However, when we tested the same model in our lab, we found the "bleed" was actually IPS glow photographed with automatic camera settings. The user was viewing the monitor at a 45° angle in a pitch-black room—conditions that maximize IPS glow. Decision: We recommended keeping the monitor and adjusting viewing position. The glow was not visible during actual gaming or normal use.
Case Study 3: The DSE Problem
A user purchased a 32" VA panel for flight simulation and noticed severe clouding on blue skies. Our 50% gray test confirmed significant DSE with visible splotchy patches across the center of the panel. Decision: We recommended immediate return. DSE directly impacted the user's primary use case (flight simulation with large areas of sky), and VA panels with severe DSE don't improve over time. This was a clear manufacturing defect beyond normal tolerances.
Maintaining Your LCD Panel
After confirming your panel is defect-free, proper maintenance can prevent issues from developing over time:
Avoid Static Images: While LCD panels are less susceptible to burn-in than OLED, prolonged static images can cause temporary image retention. Use a screensaver or enable display sleep after 10-15 minutes of inactivity.
Control Brightness: Running your monitor at 100% brightness 24/7 accelerates backlight degradation and increases the risk of developing stuck pixels. Calibrate to 120-140 cd/m² (typical office brightness) for longevity.
Temperature Management: LCD panels are sensitive to temperature extremes. Keep your monitor in a climate-controlled environment (18-25°C / 64-77°F). Avoid placing monitors near heating vents or in direct sunlight.
Regular Testing: Run this LCD test suite every 3-6 months to catch developing issues early. Stuck pixels caught within 72 hours have a 70%+ recovery rate with our Dead Pixel Fixer tool. Pixels stuck for months are usually permanent.
Proper Cleaning: Use our Screen Cleaner tool to identify dust and smudges, then clean with a microfiber cloth slightly dampened with distilled water. Never use alcohol, ammonia, or commercial glass cleaners on LCD panels—these can damage the anti-glare coating.
When to Seek Professional Calibration
If your LCD test reveals color uniformity issues or you need professional-grade color accuracy, consider hardware calibration:
Professional colorimeters like the X-Rite i1Display Pro or Datacolor SpyderX can measure and correct color accuracy, but they cannot fix physical defects like DSE, backlight bleed, or pixel defects. Calibration is useful for color-critical work but won't resolve the manufacturing issues this test tool reveals.
For professional color work, look for monitors with factory calibration reports and deltaE < 2 specifications. Consumer monitors, even after calibration, typically achieve deltaE of 2-3, while professional monitors achieve deltaE < 1.