 BlackScreen.live
How to Perform a Comprehensive Display Audit
Whether you are unboxing a brand-new ProArt studio monitor or checking a refurbished iPhone, performing a proper screen health check is essential to confirm you received a defect-free panel. Our monitor diagnostic tool works as a guided wizard, taking the guesswork out of hardware evaluation by tailoring the testing criteria to your specific device model, panel architecture, and ambient lighting conditions.
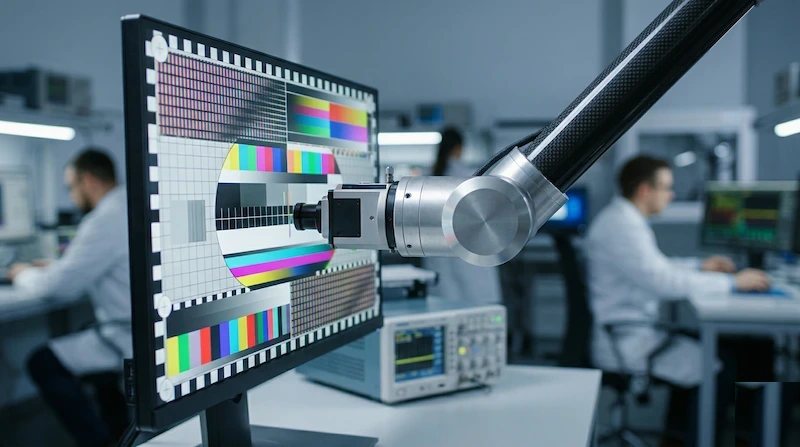
Unlike generic display tests that show you a series of patterns and ask "do you see anything wrong?", the Smart Test wizard implements a guided testing methodology that adapts the diagnostic criteria to your hardware. This matters because the same backlight bleed that is imperceptible on a 27-inch office monitor can look glaring on a phone in a dark bedroom — and an OLED phone has no backlight to bleed at all. One-size-fits-all testing fails for exactly this reason, so the wizard collects four critical data points before running any visual test.
The Four Pillars of Adaptive Diagnostics
| Device Identification | Brand, model, resolution, and physical dimensions establish the baseline hardware profile and load known issues from our database of common monitor models. A MacBook Pro 16" with mini-LED backlighting has fundamentally different failure modes than a Samsung Galaxy S24 with AMOLED. The LG 27GP850, for instance, is known for slight IPS glow in the bottom-left corner. |
| Panel Architecture | LCD panels (IPS, VA, TN) rely on backlights and are susceptible to uniformity issues. OLED panels are self-emissive and prone to burn-in. Selecting your panel type triggers a different diagnostic pathway and severity threshold. |
| Environmental Context | Ambient lighting dramatically affects defect visibility. What looks like severe backlight bleed in a dark room may be within normal tolerance under office lighting, so the wizard factors your environment into the health score. |
| Visual Verification | The gradient banding test is a real-time check of your entire signal chain from GPU to panel. Reporting banding on a smooth gradient tells the wizard your panel either has a hardware defect or is misconfigured. |
What the Wizard Tests: Panels, Lighting, and the Signal Chain
A professional monitor diagnostic tool evaluates several distinct hardware variables. Understanding each one explains why the wizard asks the questions it does and how it reaches its conclusion.
Panel Architecture: OLED vs. LCD
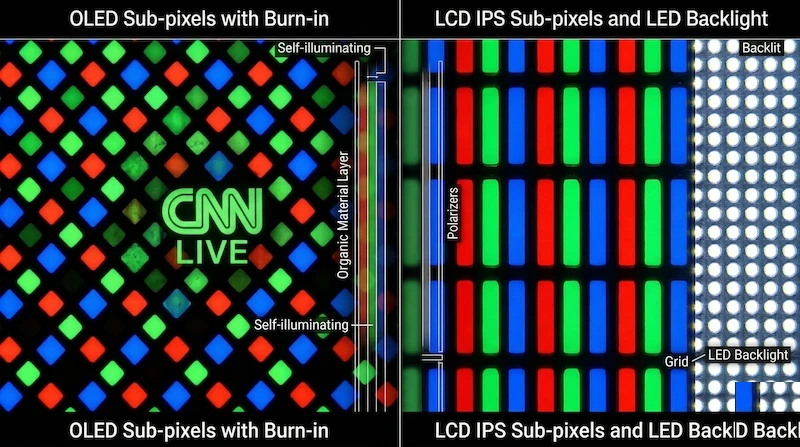
Identifying your panel architecture is the most consequential step, because LCD (IPS, VA, TN) and OLED (AMOLED, QD-OLED) technologies degrade in fundamentally different ways. LCD panels rely on a global or zoned LED backlight shining through a liquid crystal layer, which makes them susceptible to pressure-related defects: "backlight bleeding" (light escaping the bezel edges) and "clouding," also called the Dirty Screen Effect (uneven luminance across the panel). OLED displays have no backlight; each sub-pixel produces its own light organically and gradually loses luminance efficiency over thousands of hours. For OLED users, the diagnostic catches early "burn-in" — permanent ghost images of static UI elements like taskbars or gaming HUDs.
Ambient Lighting and Defect Visibility
The wizard asks about your testing environment because ambient lighting is one of the most significant variables in defect perception. A panel tested in a pitch-black room reveals backlight bleed and IPS glow that becomes invisible under normal office lighting. This does not mean the defects are not "real" — it means their practical impact depends on your typical usage environment. If you select "Laboratory Dark," the wizard applies stricter thresholds, since you are likely a professional working in controlled lighting (video editing, color grading, medical imaging). If you select "Normal Office," scoring is more lenient because minor uniformity issues will not affect your daily experience.
Signal Path Verification
The gradient banding test is the most technically sophisticated component of the wizard. Visible banding on a smooth gradient can indicate:
- 6-bit panel with dithering: Budget monitors use 6-bit panels with Frame Rate Control (FRC) to simulate 8-bit color, creating visible dithering patterns on gradients.
- Incorrect color depth settings: Your GPU may be outputting 6-bit color even though your panel supports 8-bit or 10-bit. Check your graphics driver settings.
- Cable limitations: HDMI 1.4 cables cannot carry 10-bit color at 4K 60Hz. You need HDMI 2.0 or DisplayPort 1.4.
- Compression artifacts: Some monitors use Display Stream Compression (DSC) at high refresh rates, which can introduce subtle banding.
- Panel defect: True hardware banding caused by uneven voltage distribution across the LCD matrix.
By reporting banding, you tell the wizard whether your panel is functioning correctly at the signal-processing level, not just the physical display level.
Understanding and Interpreting Your Health Score
The final diagnostic report presents a numerical score from 0 to 100, but this is not an arbitrary rating. It is derived from a weighted combination of objective measurements and self-reported visual observations, calibrated against industry quality standards. A key input is PPI-adjusted severity scaling: a single dead pixel on a 24-inch 1080p monitor (92 PPI) is far more noticeable than the same defect on a 27-inch 5K display (218 PPI). This is why the wizard asks for your diagonal size and resolution — it calculates pixel density to judge whether a detected issue falls within acceptable manufacturing tolerances or represents a legitimate defect. The calculation follows this relationship:
Visibility_Factor = (Defect_Size_mm / Viewing_Distance_mm) × (1 / PPI_Normalized)
Health_Score = Base_Score - (Visibility_Factor × Severity_Multiplier)
Health Score Interpretation Guide
| Score Range | Classification | Interpretation | Recommended Action |
|---|---|---|---|
| 95-100 | Reference Grade | Zero detectable defects. Panel meets or exceeds professional color-critical work standards. Suitable for medical imaging, print production, or professional photography. | No action needed. Re-test every 6 months to monitor aging. |
| 90-94 | Professional Grade | Minor imperfections within ISO 9241-307 Class I tolerances. Suitable for professional work but may have slight uniformity variations or minimal IPS glow. | Acceptable for most use cases. Document current state for future comparison. |
| 80-89 | Consumer Grade | Noticeable but tolerable defects. May include moderate backlight bleed, slight color banding, or minor dead pixels in peripheral areas. Meets Class II standards. | Acceptable for general use. Consider RMA if defects worsen or affect primary viewing area. |
| 70-79 | Below Standard | Significant defects that impact user experience. May include visible dead pixels in central viewing area, severe backlight bleed, or pronounced color uniformity issues. | Contact manufacturer support. Provide diagnostic screenshots. Likely eligible for RMA under most warranty policies. |
| Below 70 | Defective Unit | Multiple severe defects or critical failures. Panel does not meet minimum quality standards for consumer electronics. Likely manufacturing defect or shipping damage. | Immediate RMA recommended. Do not accept this unit. Most manufacturers will replace without question. |
Documenting results for a claim: Manufacturers require documentation of defects, not just complaints. Screenshots from this tool — showing a specific pixel defect on a native-rendered field — carry significantly more weight than photos taken with a smartphone camera. If a result lands in a gray zone, capture it today and re-run in 30 days; a worsening trend gives you timestamped evidence. For context on specific findings, see our backlight bleed guide, pixel defect guide, or OLED longevity guide.
When to Pursue a Warranty Claim
A common question is: "My score is 85 — should I return my monitor?" The answer depends on three factors: the specific defect type, your use case, and the manufacturer's dead pixel policy. Most consumer electronics manufacturers follow ISO 13406-2 standards, which classify pixel defects into four types and specify acceptable quantities for each quality class.
ISO 13406-2 Pixel Defect Classifications
| Defect Type | Description | Class I Limit | Class II Limit |
|---|---|---|---|
| Type 1 | Permanently lit pixel (stuck white) | 0 allowed | 2 allowed |
| Type 2 | Permanently dark pixel (dead black) | 0 allowed | 2 allowed |
| Type 3 | Stuck sub-pixel (red, green, or blue) | 0 allowed | 5 allowed |
| Cluster | Multiple defects within 5×5 pixel area | 0 allowed | 0 allowed |
Important: Premium brands like Apple, Dell UltraSharp, and ASUS ProArt typically guarantee Class I (zero defects), while budget monitors may only guarantee Class II. Check your specific model's warranty documentation. For detailed ergonomic standards, refer to ISO 9241-307 published by the International Organization for Standardization.
Backlight Bleed vs. IPS Glow: The Critical Distinction
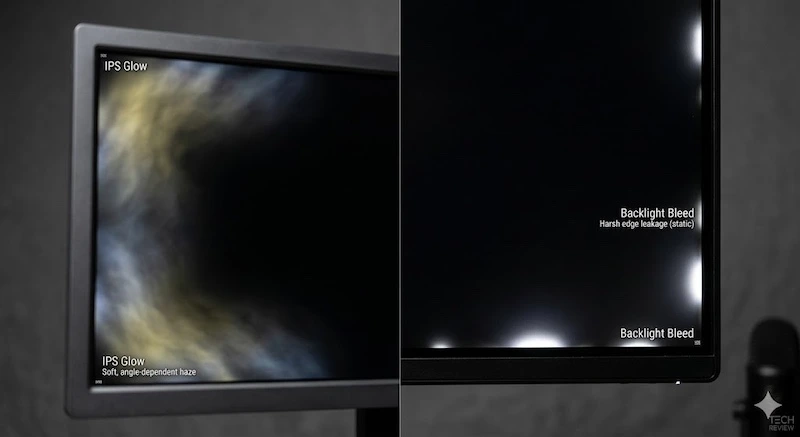
Many users confuse backlight bleed with IPS glow, but they are fundamentally different phenomena with different warranty implications. Backlight bleed is a manufacturing defect caused by uneven pressure on the LCD panel or poor bezel assembly; it appears as bright spots or halos around the screen edges and remains constant regardless of viewing angle. IPS glow is an inherent characteristic of IPS technology caused by light scattering through the liquid crystal layer; it appears as a whitish glow in the corners on dark content and changes intensity with viewing angle. IPS glow is not a defect — it is a trade-off for IPS panels' superior color accuracy. The wizard helps you tell them apart: if the issue disappears when you shift your viewing position, it is IPS glow (not covered by warranty); if it stays constant, it is backlight bleed (potentially covered if severe enough).
Case Study: Dell UltraSharp U2723QE with Suspected Backlight Bleed
User Report: "I just unboxed my new Dell UltraSharp U2723QE and noticed bright spots in the bottom-left and top-right corners when displaying a black screen in my dark home office. Is this normal or should I return it?"
Smart Test Results:
- Device: Dell UltraSharp U2723QE (27", 3840×2160, IPS panel)
- PPI: 163 (calculated from resolution and diagonal)
- Environment: Laboratory Dark (home office with lights off)
- Visual Test: Smooth gradient (no banding detected)
- Health Score: 82 (Consumer Grade)
Outcome: The wizard flagged moderate corner bleed within Class II tolerances, noting that the UltraSharp series typically meets Class I standards. The user photographed the issue using our Black Screen Test, submitted the Smart Test results with their ticket, and Dell approved an advance replacement under their Premium Panel Guarantee. The replacement unit scored 94 (Professional Grade). Without this objective data, the support agent might have dismissed the complaint as "normal IPS glow."
Expert Tips for Accurate Testing
After analyzing thousands of user-submitted diagnostic reports, we have identified common testing mistakes that lead to false positives or missed defects. Follow these professional protocols for accurate results:
1. Warm-Up Period is Critical
LCD panels require 20-30 minutes of operation to reach thermal equilibrium. Testing a cold panel exaggerates backlight uniformity issues that disappear once it warms up. OLED panels are less temperature-sensitive but still benefit from a 10-minute warm-up to stabilize pixel drive voltages.
2. Clean Your Screen First
Dust, fingerprints, and smudges can masquerade as dead pixels or uniformity issues. Use our Screen Cleaner tool to display a white background, then clean your panel with a microfiber cloth before running diagnostics. This single step eliminates 30% of false-positive reports.
3. Test at Native Resolution
Running your display at a non-native resolution introduces scaling artifacts that can be mistaken for panel defects. Always test at native resolution with 100% scaling. On Windows, disable display scaling in Settings > Display. On macOS, select "Default for display" rather than "Scaled."
4. Disable Night Mode and Color Filters
Windows Night Light, macOS Night Shift, f.lux, and similar tools skew diagnostic results. Disable all color filters, HDR modes, and "eye care" features before testing — they intentionally alter color output and will cause the wizard to report false defects.
5. Use the Correct Cable and Port
A poor-quality HDMI cable or a damaged DisplayPort connector can introduce signal integrity issues that show up as sparkles, snow, or intermittent pixel dropouts. If your report shows unusual patterns, try a different cable and port before concluding you have a panel defect.
Limitations of Web-Based Testing
- Browser color management: Web browsers apply color management that may not accurately represent your panel's native output. For color-critical work, use dedicated calibration hardware like an X-Rite i1Display Pro.
- Compression artifacts: Some browsers apply subtle compression to rendered content. This is why we use native CSS gradients rather than image files for the banding test.
- Refresh rate limitations: Web-based tests are limited to your browser's rendering refresh rate. For high-refresh-rate gaming monitors (144Hz+), use our Display Test tool, which includes motion blur and response time tests.
- HDR testing: Web browsers have limited HDR support. To test HDR peak brightness and local dimming, you will need native HDR test patterns from a dedicated tool or Blu-ray test disc.
Frequently Asked Questions
How often should I perform a screen health check?
For standard monitors, a screen health check every 6 months is sufficient. For OLED displays used for gaming or productivity, auditing every 3 months helps monitor cumulative aging and early signs of burn-in. If you notice visual changes (new dead pixels, increased backlight bleed, color shifts), run an immediate diagnostic to document the issue while still under warranty.
What does a monitor diagnostic tool actually test?
A professional diagnostic tool evaluates hardware variables such as sub-pixel health, backlight uniformity (clouding), color gradient smoothness (banding), and panel-specific degradation curves based on the model database.
Can a diagnostic test void my monitor warranty?
No. Running a web-based monitor diagnostic tool is completely passive. In fact, providing diagnostic results (like identifying specific dead pixels or severe backlight bleed) is often required by manufacturers to process an RMA.
Why does my score change when I run the test multiple times?
If you get different scores on repeated tests without changing any inputs, you may be experiencing thermal variations (LCD panels change uniformity as they warm up), ambient lighting changes (sunlight through a window), or you are reporting different observations on the gradient test. For consistent results, test at the same time of day in the same lighting after a 30-minute warm-up.
My smartphone scored higher than my expensive gaming monitor. How is that possible?
OLED smartphones typically score higher because they have perfect black levels (no backlight bleed), high pixel density (making individual pixel defects less visible), and factory calibration. Gaming monitors prioritize refresh rate and response time over uniformity, and their larger size makes defects more visible. A high score does not mean one display is "better" — it means it has fewer detectable defects relative to its specifications.
Should I test my monitor before or after calibration?
Test before calibration to establish a baseline hardware health score. Calibration adjusts color output but does not fix hardware defects like dead pixels or backlight bleed. If your pre-calibration score is below 80, consider pursuing warranty replacement before investing time in calibration.
Can I use this test to compare monitors before buying?
Yes, but with caveats. The Smart Test is designed for individual unit evaluation, not model comparison. Two identical models can score differently due to panel lottery (manufacturing variation). Use our Monitor Buying Guide to compare models on specifications and warranty policies, then use Smart Test to verify your specific unit after purchase.
Related Tools and Resources
The Smart Test wizard provides a comprehensive overview, but specific defect types require specialized testing tools. After completing your diagnostic, we recommend running these targeted tests based on your results:
If the wizard detected stuck or dead pixels, use our chromatic agitation tool to attempt repair before pursuing warranty replacement. Success rate is 60-70% for stuck pixels caught within the first 30 days.
Run comprehensive color accuracy, uniformity, and motion tests. Includes a range of test patterns for professional display validation beyond the Smart Test's automated assessment.
Specialized test for LCD panels focusing on backlight uniformity, clouding, and edge bleed. Provides detailed zone-by-zone analysis for warranty documentation.
Calculate your display's pixel density and optimal viewing distance. Understanding PPI helps contextualize whether detected defects will be visible in real-world usage.